Edmodo – Free Online Conference

Flickr Photo User: Karen McMillan

Flickr Photo User: Karen McMillan

Edmodo is a great online learning management system. It allows you to assign items to students to have automatically graded (think probes), students to collaborate, and teachers to have a nice virtual space to work with students. Several of our teachers have been using it for years and highly recommend it. It’s a great tool that runs on any device we provide students (iPads, Chromebooks, iPods, etc.)

That being said, EdmodoCon is a free, online event held on August 6th to allow users and interested parties to learn more about the innovative ways teachers and students are using the product. Register and find out more information here. Go ahead and download the EdmodoCon Starter Kit (PDF) to learn more about being prepared for the event. As always, I’m available to answer any questions you may have.

Google Forms for Assessment

This is a great video to get you into the basics of using Google Forms to create assessments for your students. Yes, there is a way to make it grade automatically, but it is a pretty geeky process. I’ll share it in a later post in case you are interested. As always, feel free to email or call me if you want any help integrating this into your classroom.

Geddit! Got it?

Screen Shot 2014-07-10 at 4.45.24 PMFormative assessment plays perhaps the most important role in monitoring our students’ progress. Summative assessmentonly tells us what they didn’t get. That’s too late. Formative tells us what they DON’T get. That’s just in time.  It’s always nice to know what our students are thinking when we’re working through a lesson, but it’s not easily done. Until now, that is.

LetsGeddit was created by teachers for the sole purpose of diagnosing understanding issues on the spot during instruction. The great thing about the product is that it works with any web enabled device (smartphone, iPod, iPad, Chromebook, laptop, etc). And it’s pretty simple to utilize, too. If you are using Chromebooks, it is already loaded as an app once the student logs in with their school email account. Any other device just needs the student to go to letsgeddit.com and start from there.

Basically, you use it as a quick quiz tool, a climate tool, or even an exit ticket. The built in private hand raising and note sharing tools allows even your quietest students a chance to have a voice with you during the instruction without fear of ridicule or embarrassment. They can rate their level of understanding through an easy to use bar system or they can even add a note asking for more help with the concept. This is a great way to differentiate your instruction on the fly.

The kids can join the class with a Class Code you give them, and they create their accounts using their Google Apps information. Very easy to do, and only takes a minute at most. Watch the videos below to become familiar with the tool and decide if it’s for you. Let me know if you want help setting it up for your classroom. I’m confident when you see the value of the data it shares through the formative assessments, you will want to start using it that first week of school. Be sure to Follow GedditHQ on Twitter. They’re always happy to answer your questions about what their tool can do for your students.

Great Intro

Excellent How-To Get Started

Geddit – Teacher’s first experience (Shows a little about the reposts/data are viewed)

Add a Timer to Your Blog

There are times you could use a timer that’s easy to use and easy to find. So, why not put it as a widget on your blog. You can add one to your blog by following these steps.

1. Go here to find the timer.

2. Click on the gear icon in the bottom left of the timer window to go to the settings for the timer. Screen Shot 2014-07-04 at 7.58.32 PM

3. Highlight and copy the embed code given in the new window. Screen Shot 2014-07-04 at 8.00.15 PM

4. Go to the Dashboard of your blog.

5. Click on Appearance in the lefthand menu. Screen Shot 2014-07-04 at 8.03.14 PM

6. Click on Widgets in the lefthand menu.Screen Shot 2014-07-04 at 8.03.28 PM

7. Make sure you can see the widgets already in your Sidebar. You do this by making sure the arrow to the right of your Sidebar name is pointing up (just click on it). Screen Shot 2014-07-04 at 8.04.41 PM

8. Drag a Text Widget from the left side list into the now expanded Sidebar on the right. Drag it up and down in the list to place it in the order you want it. Screen Shot 2014-07-04 at 8.07.20 PM

9. Paste the code you copied earlier into the big box of the new Text widget.Screen Shot 2014-07-04 at 8.08.07 PM

10. To make sure the new timer fits inside the sidebar of your blog, we need to make it a little smaller. You do that by changing the width and height numbers in the code you just pasted. Basically, cut them in half. Change the “468” to “234” and the “420” to “210” to make it small enough.

11. Now, hit the Save button below the box you just pasted the code into.

12. Enjoy the new timer on your blog. You can change the time on it by clicking the minute or second digit you would like to change. Also, this timer has some predetermined times with music to go with it. Just use the dropdown box above the timer numbers and select the appropriate time/song.


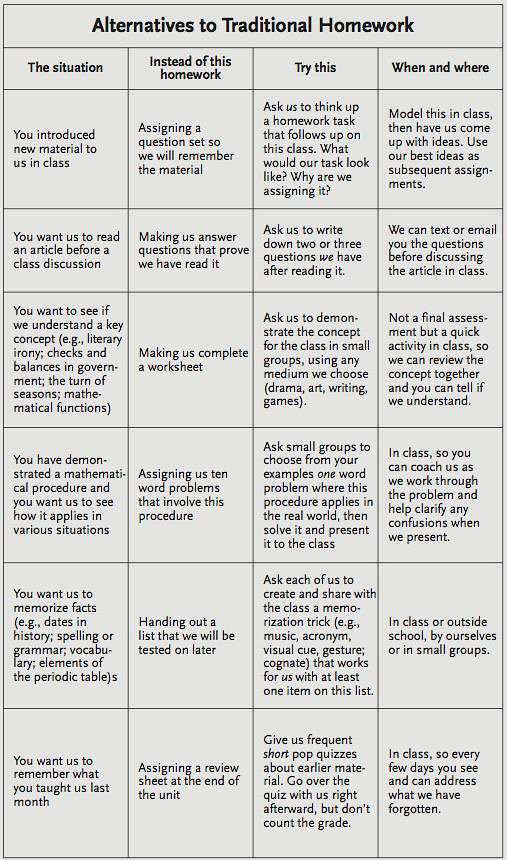
Better Alternatives to Homework

There has been a lot of research completed in the area of homework that shows it has little to no long term value. While you may agree or disagree with that statement, there is no argument that kids today have far too much of it. This takes away time from sleep, family activities, and self-directed learning. We want our kids to find a passion, volunteer in the community, go to church, and make a difference, but they need time to do just that. I also think most will agree that grading/checking homework takes up valuable face to face class time.

So how do we balance the need for content practice and the importance of students having a life outside of the school walls? Find better ways to practice the content being taught in class. Do it differently. As you plan during the summer for the 2014-15 school year, keep these alternatives from the Connected Principals blog in mind.

Homework Alternatives from Connected Prinipals

Cleaning Up YouTube

NOTE: The post below was from an email that Jacovia Cartwright sent out. It’s a great tool that I thought was worth sharing here. Thanks for letting me repost this, Jacovia.

Screen Shot 2014-04-04 at 11.24.06 AM

Teachers,

In our lessons we sometimes use YouTube as a resource. YouTube is great, but the most annoying thing about YouTube is that it comes with ads on most videos. The ad’s are at times not that bad, especially since you can skip some of them within 5 seconds. Then there are the ads that require you to watch the whole 2 minute clip and at times can be inappropriate for the students to see. This might be an issue you are facing daily and I thought I would offer a little assistance with working around the ads.

My favorite process is using “SafeShare”

The website is “www.safeshare.tv

THE PROCESS

1. Open safeshare in one tab and in a different tab find the video that you want to show on youtube.
2. Once you are playing the Youtube video you want, copy the URL either from clicking the share button under the youtube video, or copying from the URL bar at the top.
3. Once it’s copied go to the safeshare tab and paste the URL in the blank space that reads “Paste a YouTube Link”.
4.Then click the green Generate button. You will then see a link that says “take me to the safe view”. Click that link and you’re all set with an ad free video.

If you see a low quality video make sure that you have clicked the gear icon on the bottom right so the video shows in the highest quality possible. I have included a screenshot of the page below as a reference to make sure you are on the correct website. You won’t be able to click the image on this email to see the video I used. Here is a link to the safeshare video that I used for this process. http://safeshare.tv/w/nppOxTXRdX

There are other options out there like chrome browser plugins and a service called ViewPure. I have found that the safeshare process has been the most consistent for me and I have not had any issues like the others that I’ve tried. I hope this helps you out in some way with your lessons.